Payroll Module
Payroll Module : payroll module into Perfex CRM can enhance its functionality, especially for businesses that want to manage employee data and payroll processes within the same system.
We have approached a few steps to build a payroll module for our client in prefix crm as per his needs.
- Assess Your Needs : Identify the specific payroll functionalities you require within Perfex CRM. This could include features such as employee data management, time tracking, calculating wages, generating pay stubs, tax calculations.
- Research Payroll Solutions : Look for payroll software or modules that offer the features you need and are compatible with Perfex CRM. Ensure that the chosen solution provides an API or integration options.
- Data Syncing : Set up mechanisms to sync employee data, such as names, contact information, salaries, and tax withholding details, between Perfex CRM and the payroll module. This ensures that employee records are consistent across both systems and eliminates the need for duplicate data entry.
- User Interface Integration : Integrate the payroll module's functionality into the Perfex CRM user interface, making it easy for users to access payroll features within the familiar CRM environment. This might involve adding new tabs, menu options, or widgets for payroll-related tasks.
- Testing and QA : Thoroughly test the integration to ensure that data is being transferred accurately between Perfex CRM and the payroll module. Test various scenarios, such as adding new employees, processing payroll runs, and generating reports.
Now let me share the dashboard of perfex crm of our client for which we have build payroll module, for this please have a look at the screenshot below.
When you click on the payroll tab from the left hand sidebar menu then you can see the dropdown has various options like the screenshot below and we have developed all these as per client requirement.
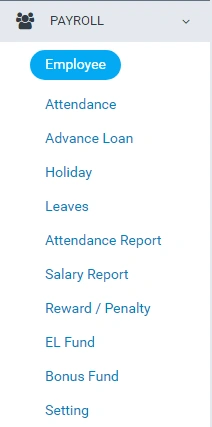
You can see that the payroll tab has lots of options and let me explain one by one each of them.
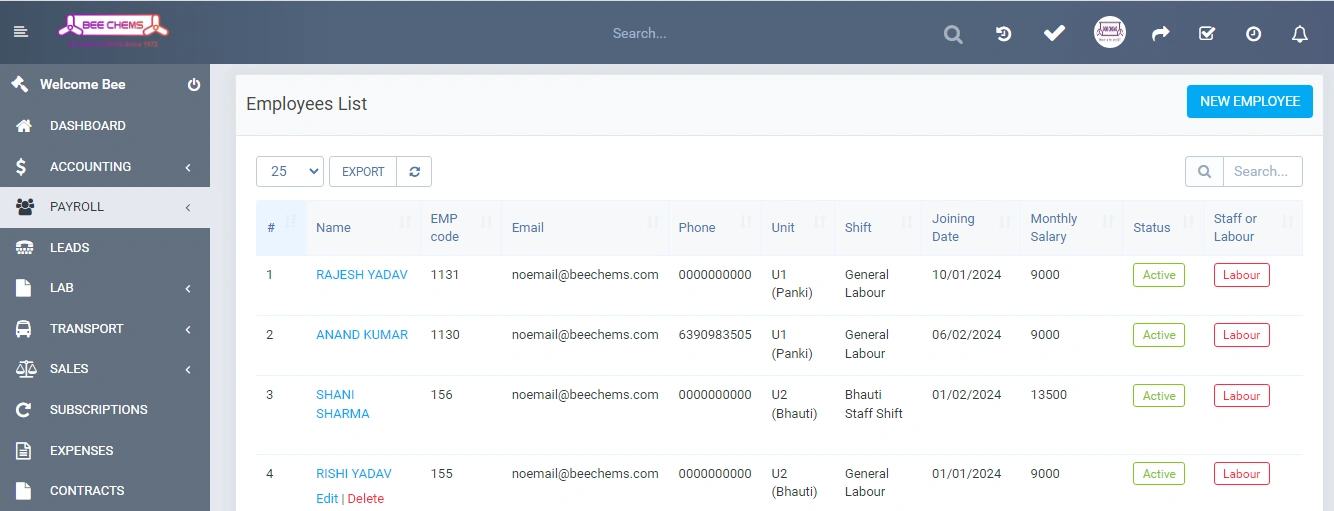
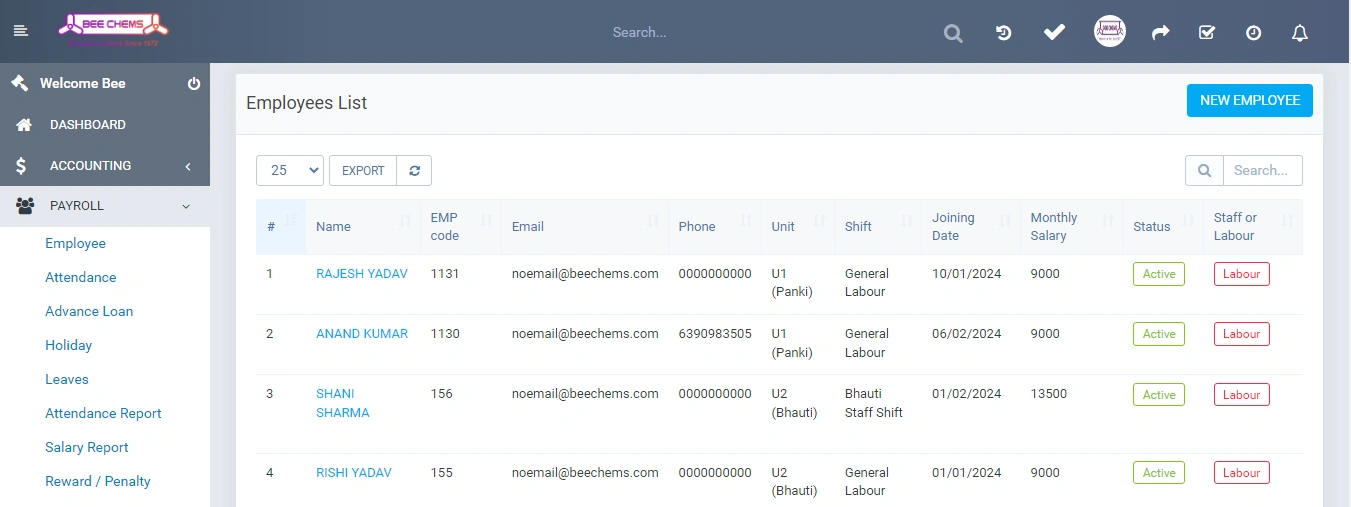
- Employee : When you click on the employee tab from the dropdown of payroll module then you can see the employee list with their details like the screenshot below.
- Name : This field belongs to the employee's full name.
- EMP Code : This belongs to the employee code.
- Email : This belongs to the employee email id.
- Phone No : This field belongs to the employee phone number.
- Unit : Company has lots of units and departments so this belongs to the unit name in which the employee is working.
- Shift : This field belongs to the employee shift like in which shift he/she is working.
- Joining Date : This field belongs to the date when the employee joined the company.
- Monthly Salary : This field belongs to the monthly salary of the respective employee.
- Status : This shows that the employee is still working or left the company.
- Staff or labor : This will show that the employee is staff member or labor.
- Attendance : When you click on the attendance tab from the dropdown of payroll module then you can see the employee list with their details like the screenshot below.
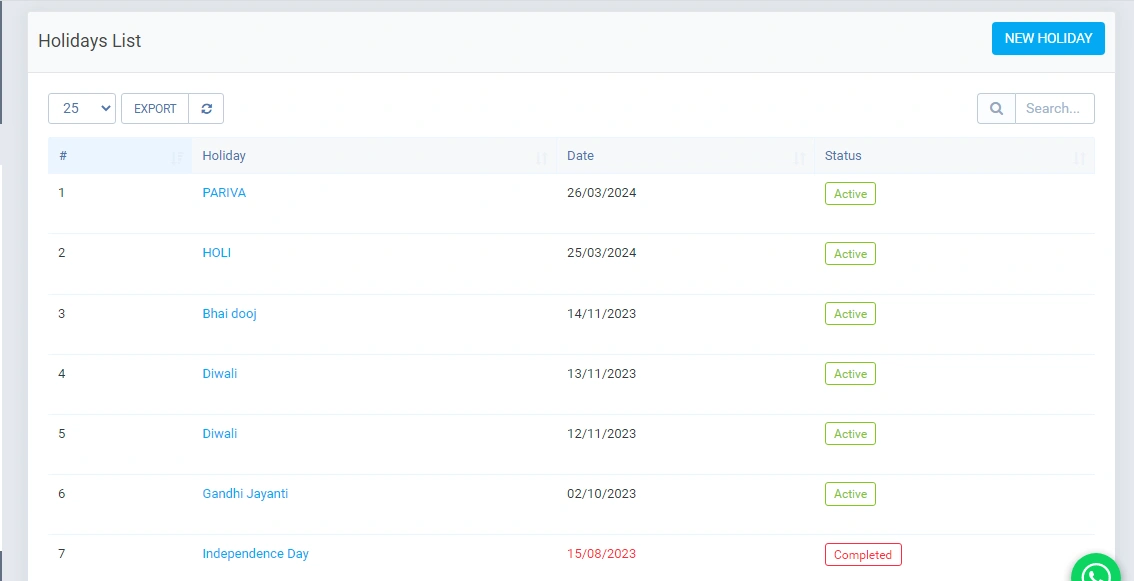
- Holiday : When you click on the holiday tab from the dropdown of payroll module then you can see the holiday list with their details like the screenshot below.
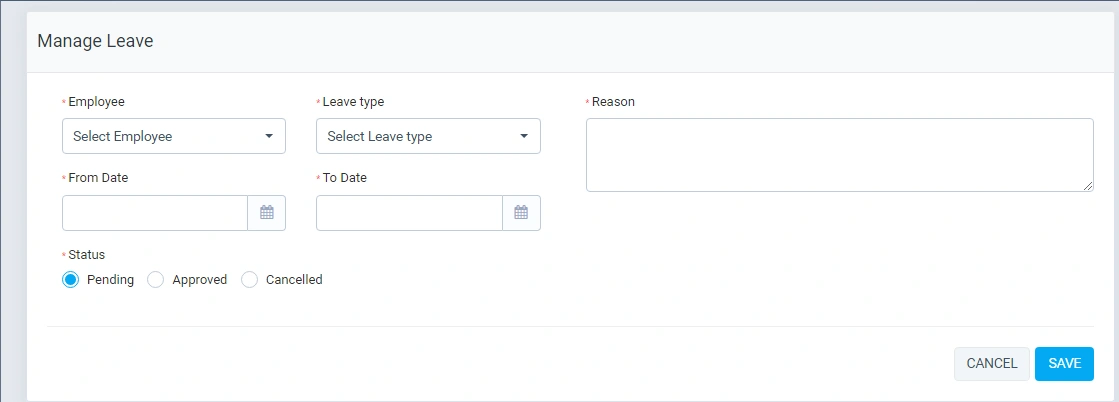
- Leaves : When you click on the Leaves tab from the dropdown of payroll module then you can see the leave list with their details like the screenshot below.
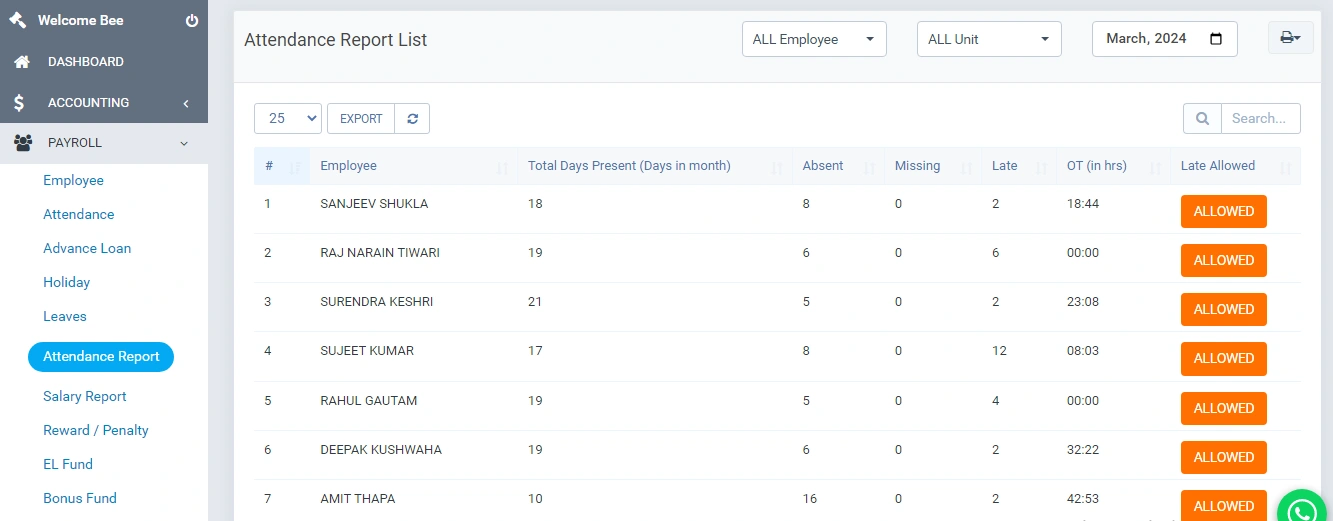
- Attendance Report : When you click on the attendance report tab from the dropdown of payroll module then you can see the leave list with their details like the screenshot below.
- Employee : This field belongs to the employee name.
- Total days present (days in month) : This field shows the total number of days employees present.
- Absent : This field shows how many days the employee is absent.
- Missing :
- Late : This field shows how many days a particular employee is late.
- OT (in hrs) : This field shows overtime hours done by respective employees.
- Late Allowed : It will be done by admin.
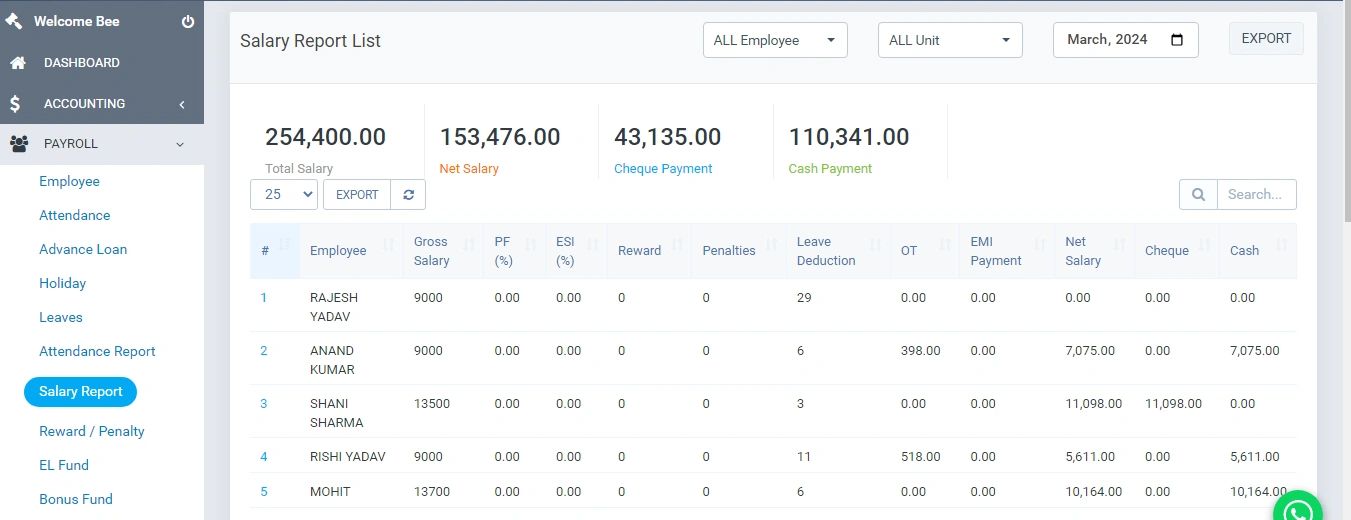
- Salary Report : When you click on the salary report tab from the dropdown of payroll module then you can see the salary report list with their details like the screenshot below.
- Employee : This field belongs to the employee name.
- Gross Salary : This field belongs to the Gross salary which means the amount received by an employee without any tax deductions.
- PF % : This field belongs to the PF which means retirement benefits scheme for salaried professionals designed to provide them with enough funds after retirement.
- ESI % : This field belongs to the ESI which means insurance cover provided to workers to aid them in uncertain and challenging times. It is a contributory fund governed by the Employee State Insurance Corporation.
- Reward : This field belongs to the reward provided by the company to the respective employee.
- Penalties : This field belongs to the penalty done by the company to the respective employee.
- Leave Deduction : This belongs to the taken leaves by the respective employee.
- OT : This field belongs to the overtime done by the respective employee.
- EMI Payment : If the employee took any loan from the company then it shows the EMI payment of that loan.
- NET Salary : This shows the amount received to the employee after deducting leaves and other things.
- Cheque/Cash : This shows how the company provided the salary to the employee like through cheque and cash.
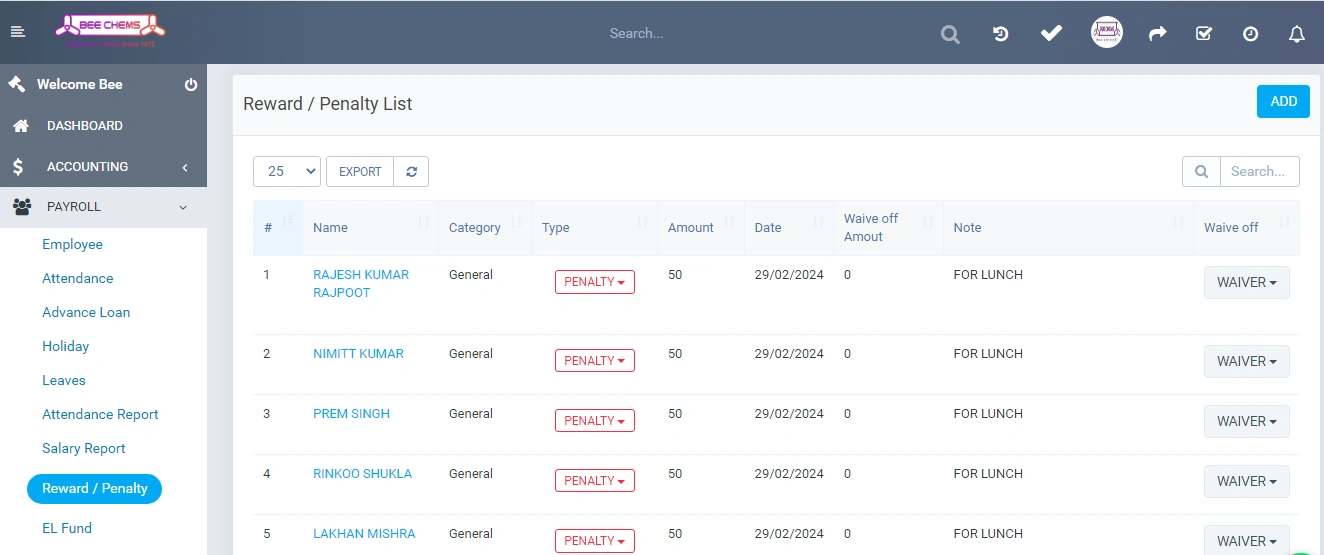
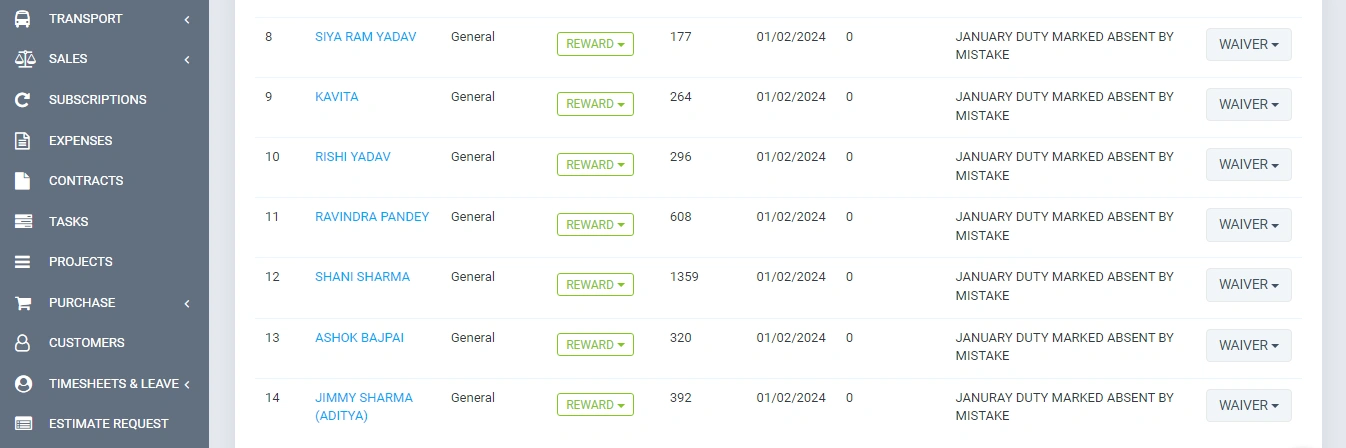
- Reward/Penalty : When you click on the reward/penalty tab from the dropdown of payroll module then you can see the reward/penalty list with their details like the screenshot below.
- Employee : This shows the name and id of the employee.
- Category : This field belongs to the category.
- Type : This shows its penalty or reward you can choose.
- Amount : This shows the respected amount of the penalty or reward.
- Date : This is the date of penalty or reward received.
- NOTE : This shows why employees are getting this.
- Waiver OFF : It has 2 options like
- EL Fund : EL stands for early leave, when you click on the EL fund tab from the dropdown of payroll module then you can see the EL fund list with their details like the screenshot below.
- Bonus Fund : When you click on the bonus fund tab from the dropdown of payroll module then you can see the bonus fund list with their details like the screenshot below.
- Settings : When you click on the settings tab from the dropdown of payroll module then you can see the settings with their details like the screenshot below.
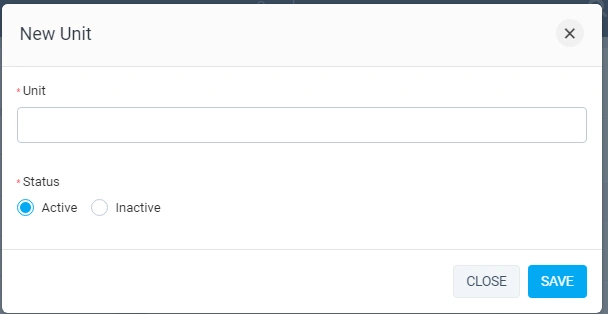
- UNIT : When you click on the unit tab from the dropdown of settings then you can see the unit with their details like the screenshot below.
- Shift :It shows the list of shifts names which are currently active in the organization.
- Priority : priority defined here for the task like todo task. Todo feature is custom implemented here. In Todo, you get a reward for completing a task on time, which is a salary in payroll.
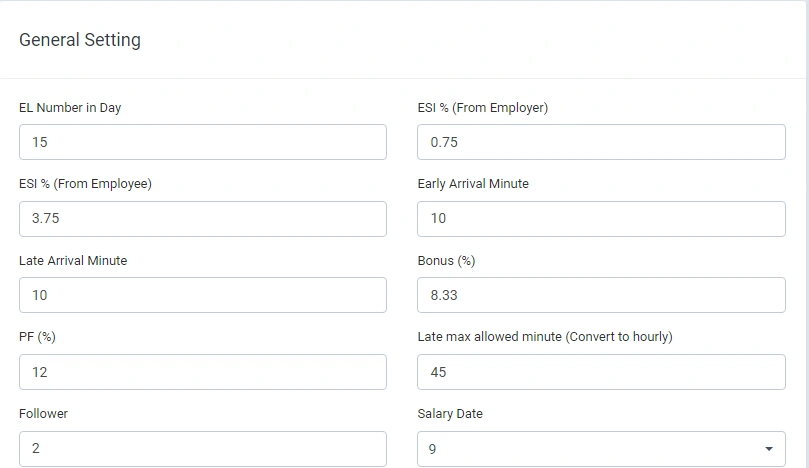
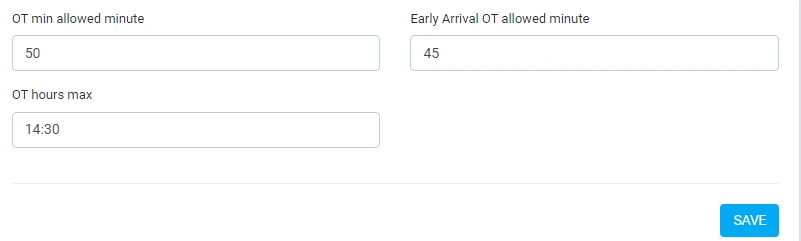
- General : It shows all the general settings for the company like you wanted to hold in your organizations. So you can fill in all the details as per your company terms and conditions.
- Attendance API : It represents the attendance here, we call here the attendance API which syncs the real attendance.
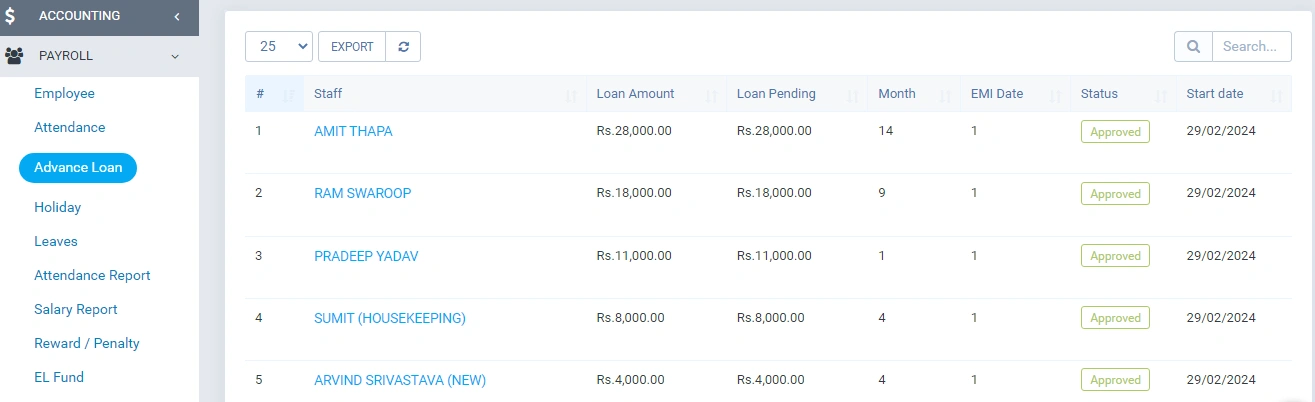
- Advance Loan : When you click on the advance loan tab from the dropdown of payroll module then you can see the advance loan list with their details like the screenshot below.
- Employee : It represents the employee name who wants to apply for a loan.
- Loan Amount : It represents the full amount of loan taken by an employee.
- Loan Pending : It shows that amount is just pending because it did not transfer to the employee account.
- Month : It represents how many months an employee will pay the back whole amount taken as loan.
- EMI : It shows on which date EMI will deduct from his salary.
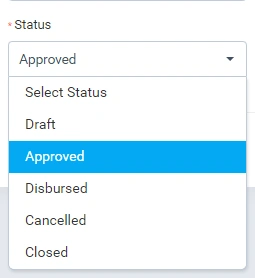
- Status : It shows the loan status like draft, approved, disbursed, canceled and closed like screenshot below.
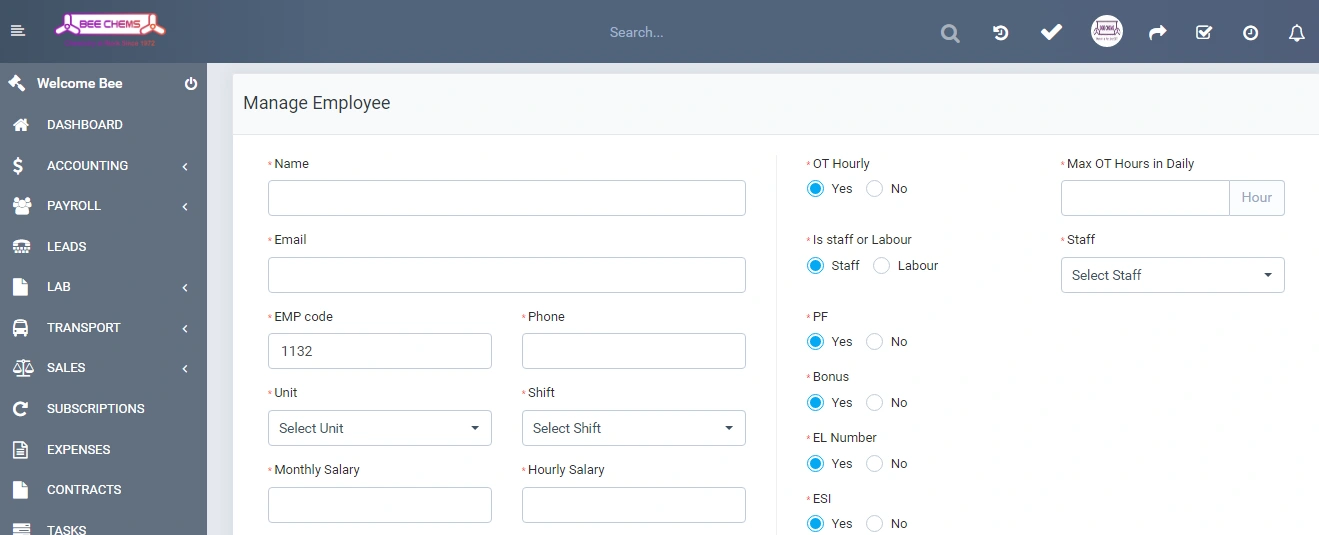
And if you want to add a new employee then you can click on the “New Employee button” just like the screenshot below.


From here you can check the date, name of employee, shift, shift start, shift end, intime, out time, shift hrs, work hrs, overtime hrs, early arrival time, late arrival time, work status, daily salary.
If an employee wants to add his salary manually then he can download the sample and after filling the downloaded sample you can import the attendance.
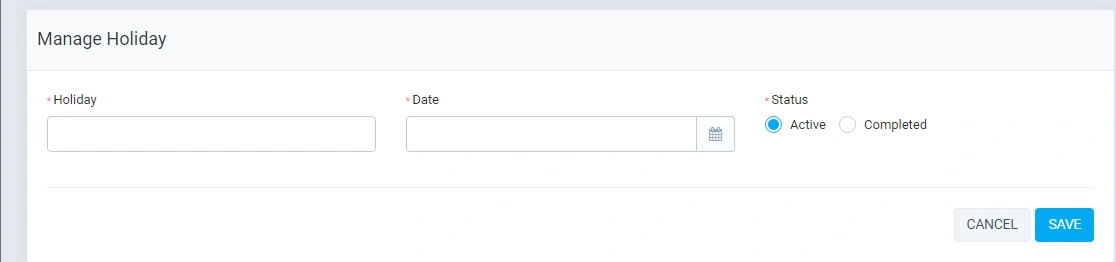
And if you want to add a new holiday then you can click on the “New Holiday” button like the screenshot below.
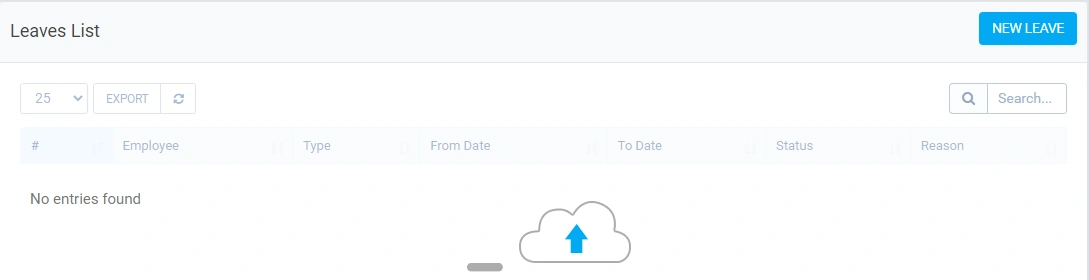
Currently there is no leave request has been done from the employee side that’s why none of the entries found. If an employee requests leave then it will show here.

If you want to add a new reward/penalty then you can simply click on “Add button” then a new pop will open like the screenshot below and you can fill in the details there.

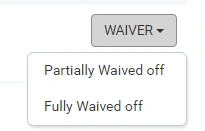
partial means - half or any other amount.
fully means - full penalty amount.
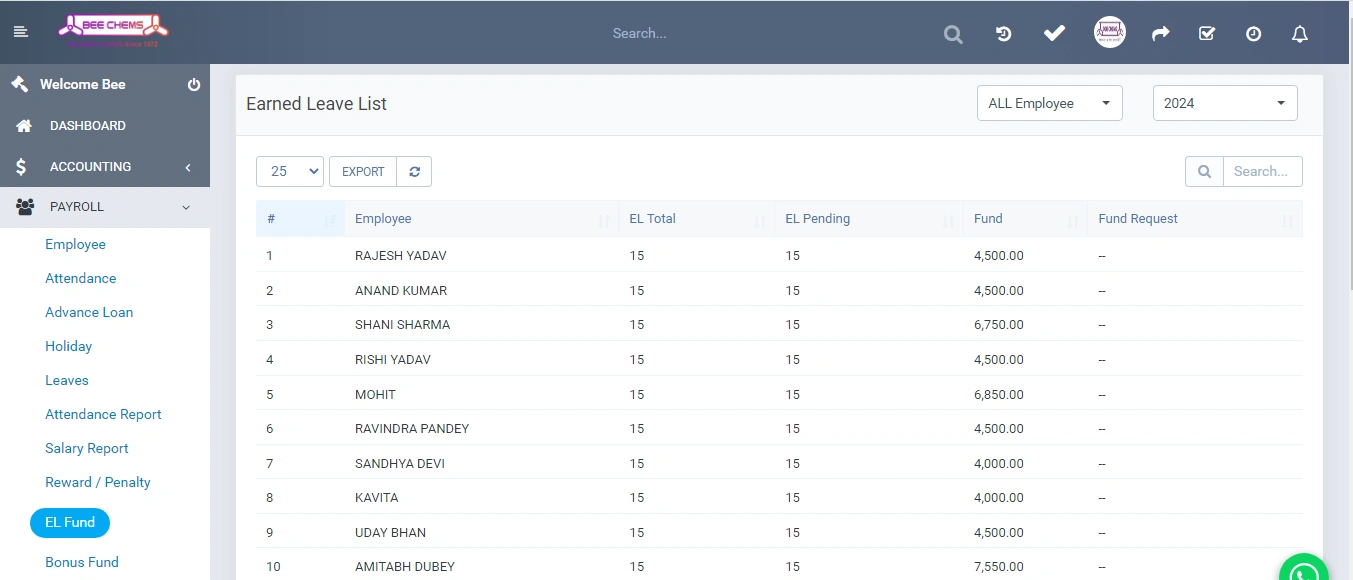
If someone does not take even a single early leave, then at the end of the year he gets the early leave money added to his salary.

No employee has received the bonus yet, hence nothing is being shown in the list. It will be done when it is added
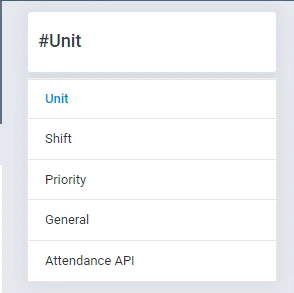
Now settings have some options like Unit, Shift, Priority, General, Attendance API.
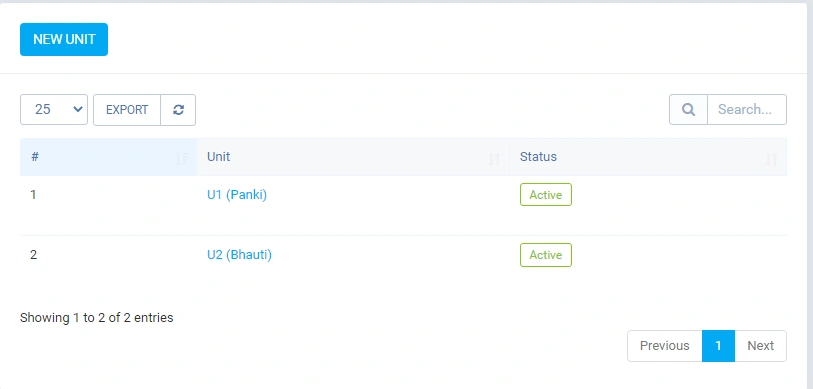
If you want to add a new unit then you can click on the “New UNIT button” and a new unit pop will open and you can fill in the details here.
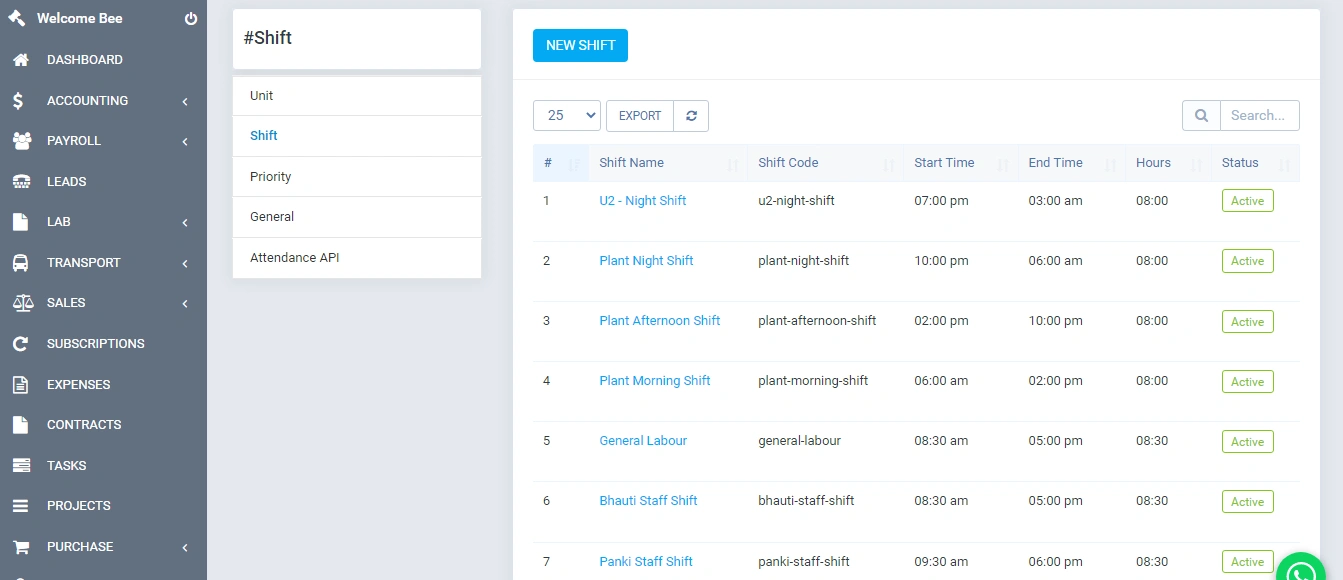
If you want to add a new shift then you can click on the “New shift button” and a new shift pop will open and you can fill in the details here.


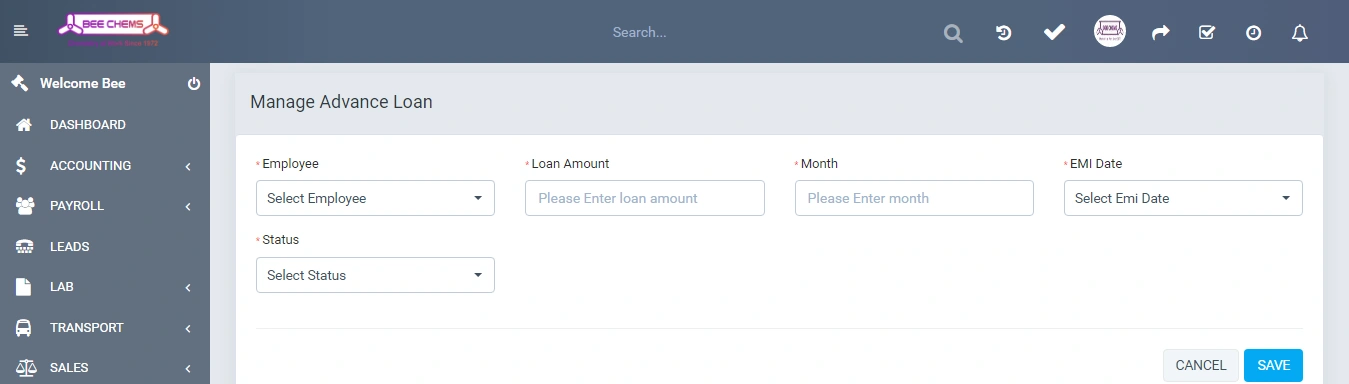
If you want to add a new advance loan then you can click on the “New Advance Loan button” and a new advance loan pop will open. Now you can fill in all the details in the field.
We hope you will like this module and it will help your business to grow. If you have any query you can contact us